> For the complete documentation index, see [llms.txt](https://docs.autommate.com/userguide/llms.txt). Markdown versions of documentation pages are available by appending `.md` to page URLs; this page is available as [Markdown](https://docs.autommate.com/userguide/installation-setup/app-installations/whatsapp-chatbot-installation.md).
# Whatsapp ChatBot Installation
This documentation explains step-by-step how to configure the Meta WhatsApp Business API and integrate it into the Autom Mate platform. Each step is detailed and supported with warnings, tips, and recommendations where critical.
***
#### 🔹 1. Creating a Meta Developer Account
* Go to the [Meta for Developers](https://developers.facebook.com) website.
* Log in with your Facebook account.
* Click “Get Started” or “My Apps” in the top-right corner of the page to activate your developer account.
💡 **Tip**: You may be required to verify your email and answer a few basic questions to activate the developer account.
***
#### 🔹 2. Creating a Meta Business (Business Portfolio)
* Go to [Meta for Business ](https://business.facebook.com).
* Create a new Business Account by entering a name, business type, and address details.
* Connecting a business portfolio to your app is only necessary for certain products and permissions. When you request access to these, you will be asked to link a business portfolio.
* You may need to verify your business.
⚠️ **Warning**: A verified Business Account may be required to use the WhatsApp Business API. However, verification is not mandatory for initial setup and testing.
🟡 **Note**: After this step, you will be able to link your app to this Business account (see Step 3).
***
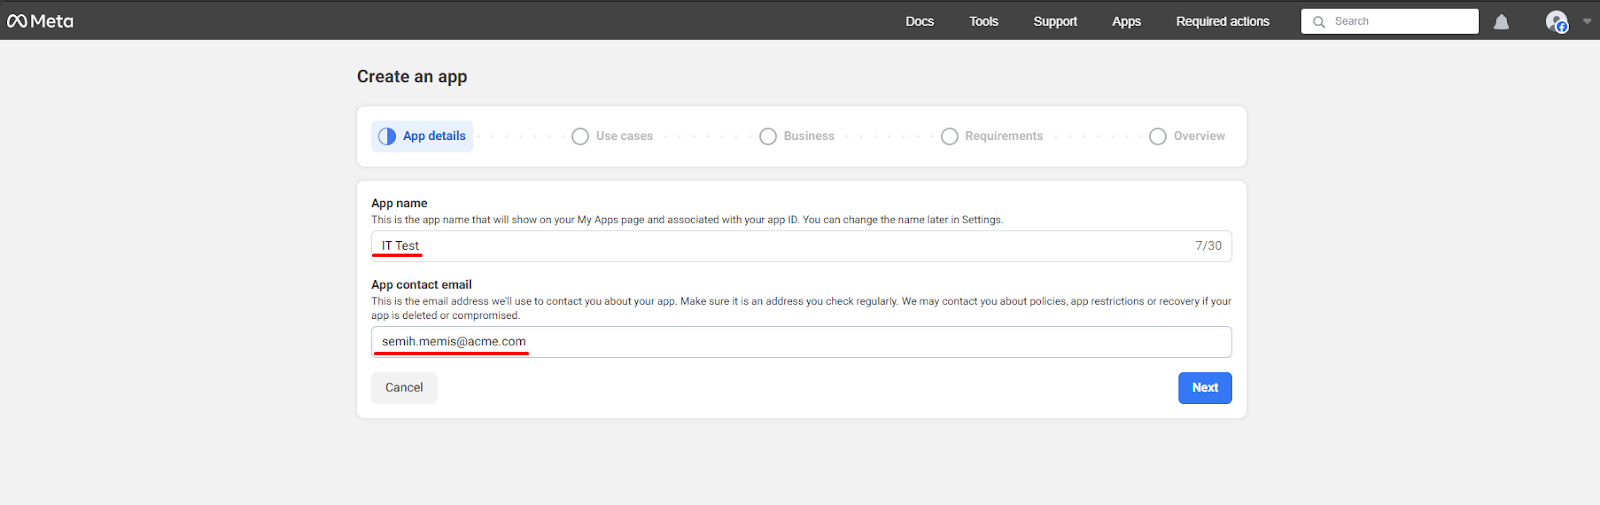
#### 🔹 3. Creating an App
* Go to [Meta for Developers](https://developers.facebook.com) and go to apps page then click to the “Create App” button.
 * Enter the **App Name** and **Contact Email**.
 * In the Use Case selection screen, set the filter to **All** and select **Other** at the bottom of the list.

 * Choose **Business** as the App Type.
* Once you proceed, the Business Account you created in Step 2 will be listed — select it to connect the app to your Business account.
* Choose **Business** as the App Type.
* Once you proceed, the Business Account you created in Step 2 will be listed — select it to connect the app to your Business account.

 💡 **Tip**: All future permission and access operations will be managed through this Business account. Make sure to select the correct one.
***
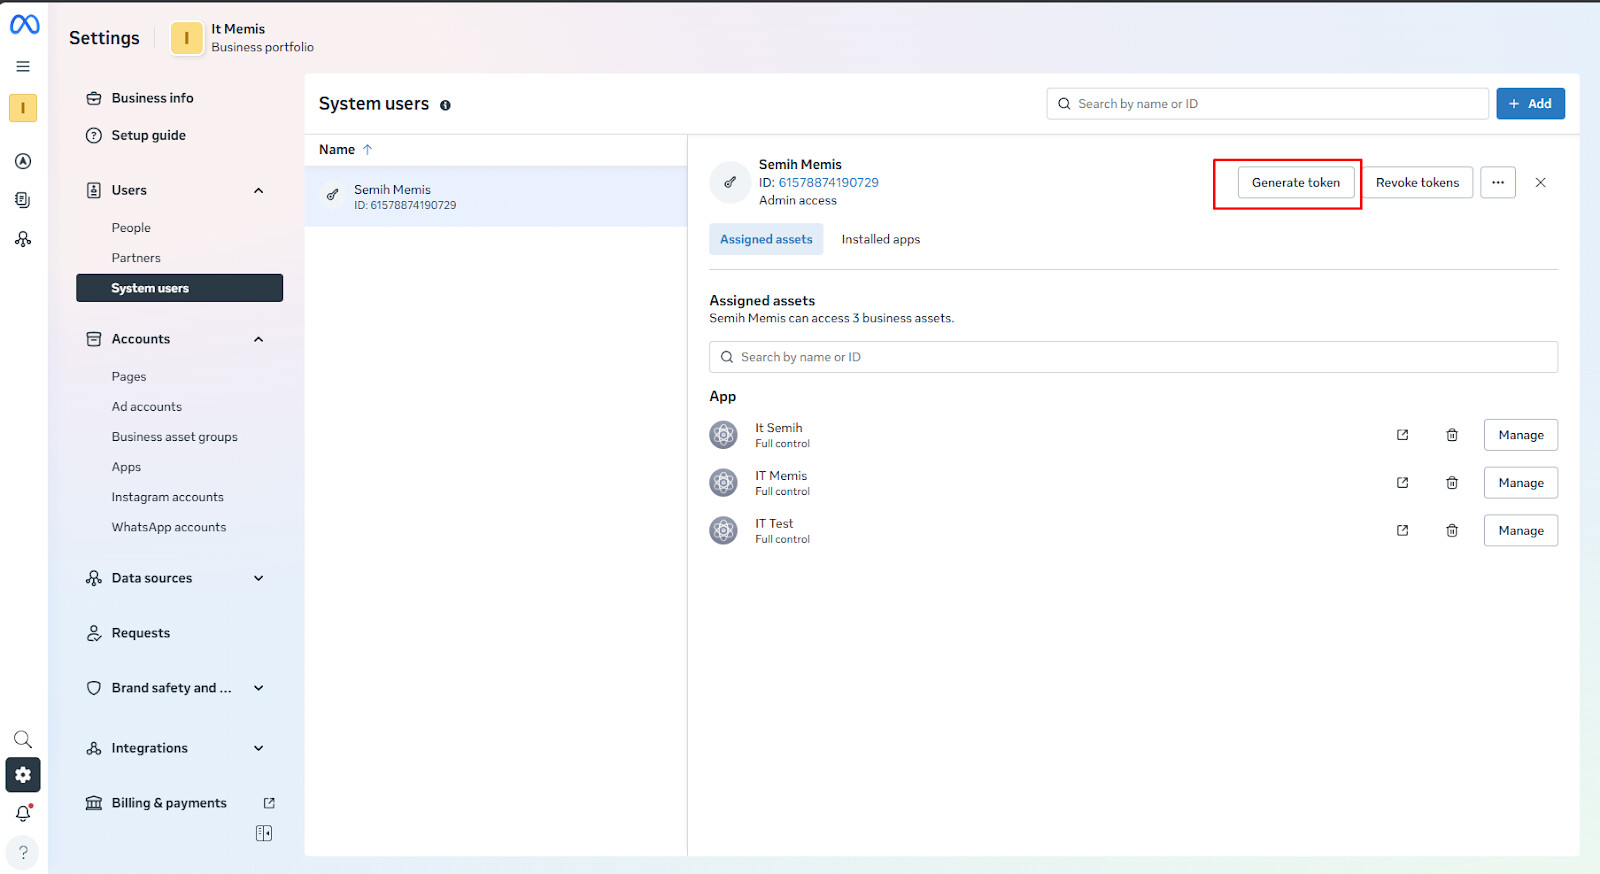
#### 🔹 4. Creating a System User and Granting Permissions
* In Business Manager, go to the left menu: **Users > System Users**.
* Click **Add** to create a new System User and assign the **Admin** role.
* Select the created user and click **Assign Assets** to link the previously created app to this user.
💡 **Tip**: All future permission and access operations will be managed through this Business account. Make sure to select the correct one.
***
#### 🔹 4. Creating a System User and Granting Permissions
* In Business Manager, go to the left menu: **Users > System Users**.
* Click **Add** to create a new System User and assign the **Admin** role.
* Select the created user and click **Assign Assets** to link the previously created app to this user.

 ⚠️ **Warning**: A system user cannot be created without an app. Therefore, app creation comes before this step.
***
#### 🔹 5. Creating a Permanent Access Token
* On the System User page, click **Generate Token**.
⚠️ **Warning**: A system user cannot be created without an app. Therefore, app creation comes before this step.
***
#### 🔹 5. Creating a Permanent Access Token
* On the System User page, click **Generate Token**.
 * Select your app.
* Set **Token Expiry** to **Never**.
* Be sure to select the following permissions:
* `whatsapp_business_management`
* `whatsapp_business_messaging`
* `whatsapp_business_manage_events`
* Select your app.
* Set **Token Expiry** to **Never**.
* Be sure to select the following permissions:
* `whatsapp_business_management`
* `whatsapp_business_messaging`
* `whatsapp_business_manage_events`
 💡 **Tip**: Select only the required permissions. Unnecessary ones may cause your app to be rejected or flagged by Meta.
⚠️ **Warning**: Save this token! You won’t be able to view it again. It will be used inside the Autom Mate Vault.
***
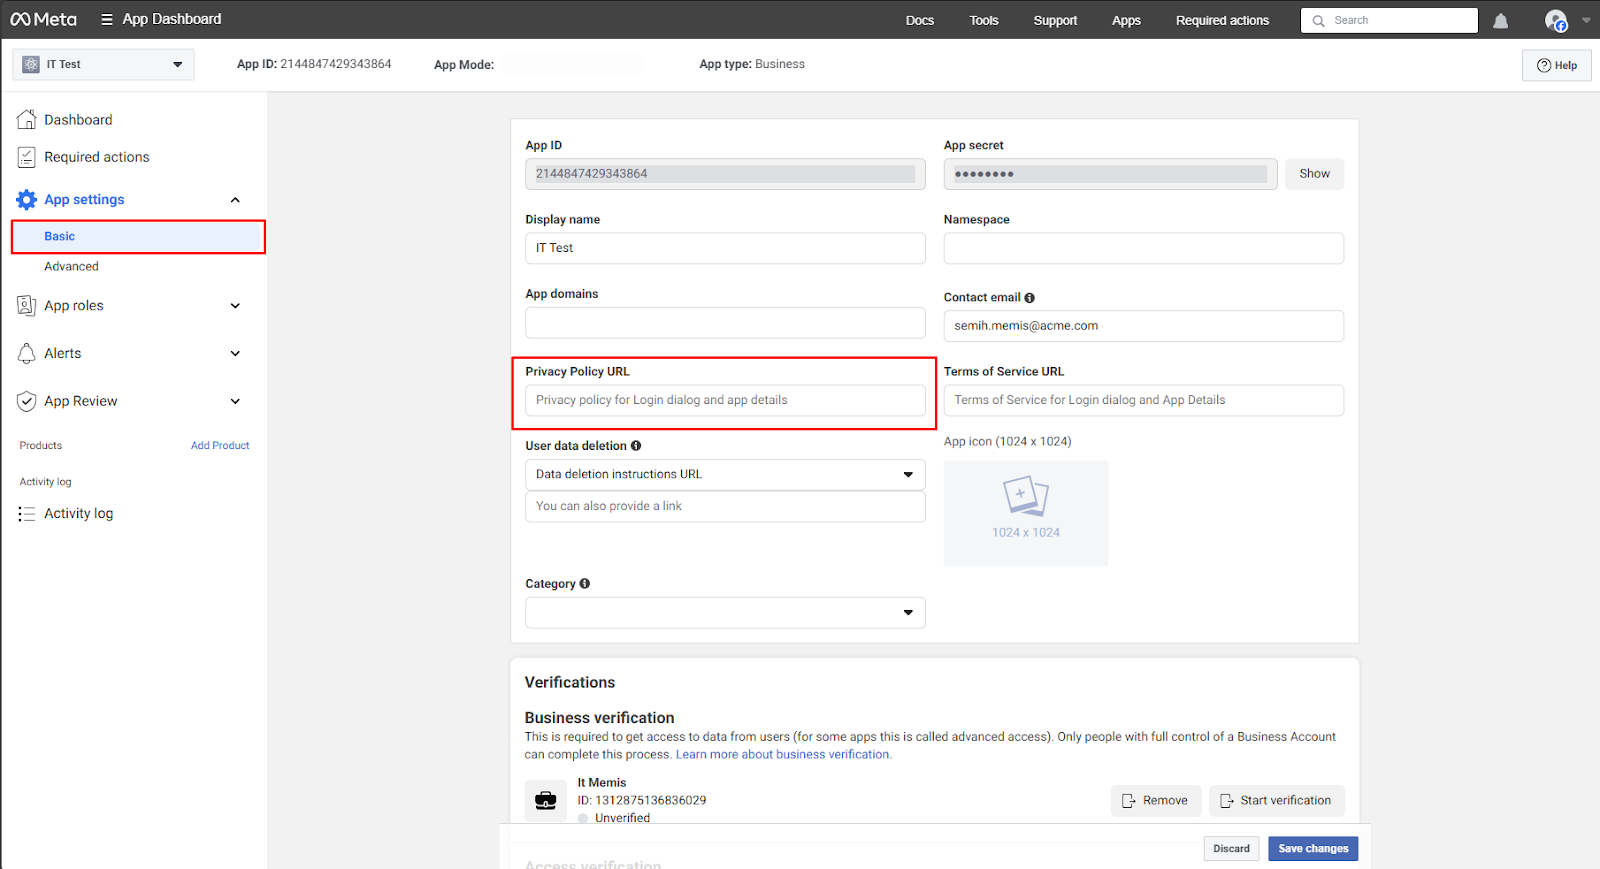
#### 🔹 6. Setting the Privacy Policy URL
* In the developer panel, go into your app.
* Go to **Settings > Basic** on the left menu.
* Paste a valid privacy policy URL into the **Privacy Policy URL** field.
💡 **Tip**: Select only the required permissions. Unnecessary ones may cause your app to be rejected or flagged by Meta.
⚠️ **Warning**: Save this token! You won’t be able to view it again. It will be used inside the Autom Mate Vault.
***
#### 🔹 6. Setting the Privacy Policy URL
* In the developer panel, go into your app.
* Go to **Settings > Basic** on the left menu.
* Paste a valid privacy policy URL into the **Privacy Policy URL** field.
 🟡 **Note**: Leaving this field empty may prevent your app from accessing certain permissions as per Meta’s policies.
***
#### 🔹 7. Starting WhatsApp API Setup
* On your developer app’s homepage, go to **Set Up > WhatsApp** tab.
🟡 **Note**: Leaving this field empty may prevent your app from accessing certain permissions as per Meta’s policies.
***
#### 🔹 7. Starting WhatsApp API Setup
* On your developer app’s homepage, go to **Set Up > WhatsApp** tab.
 * Click the **Start Using the API** button.
 ***
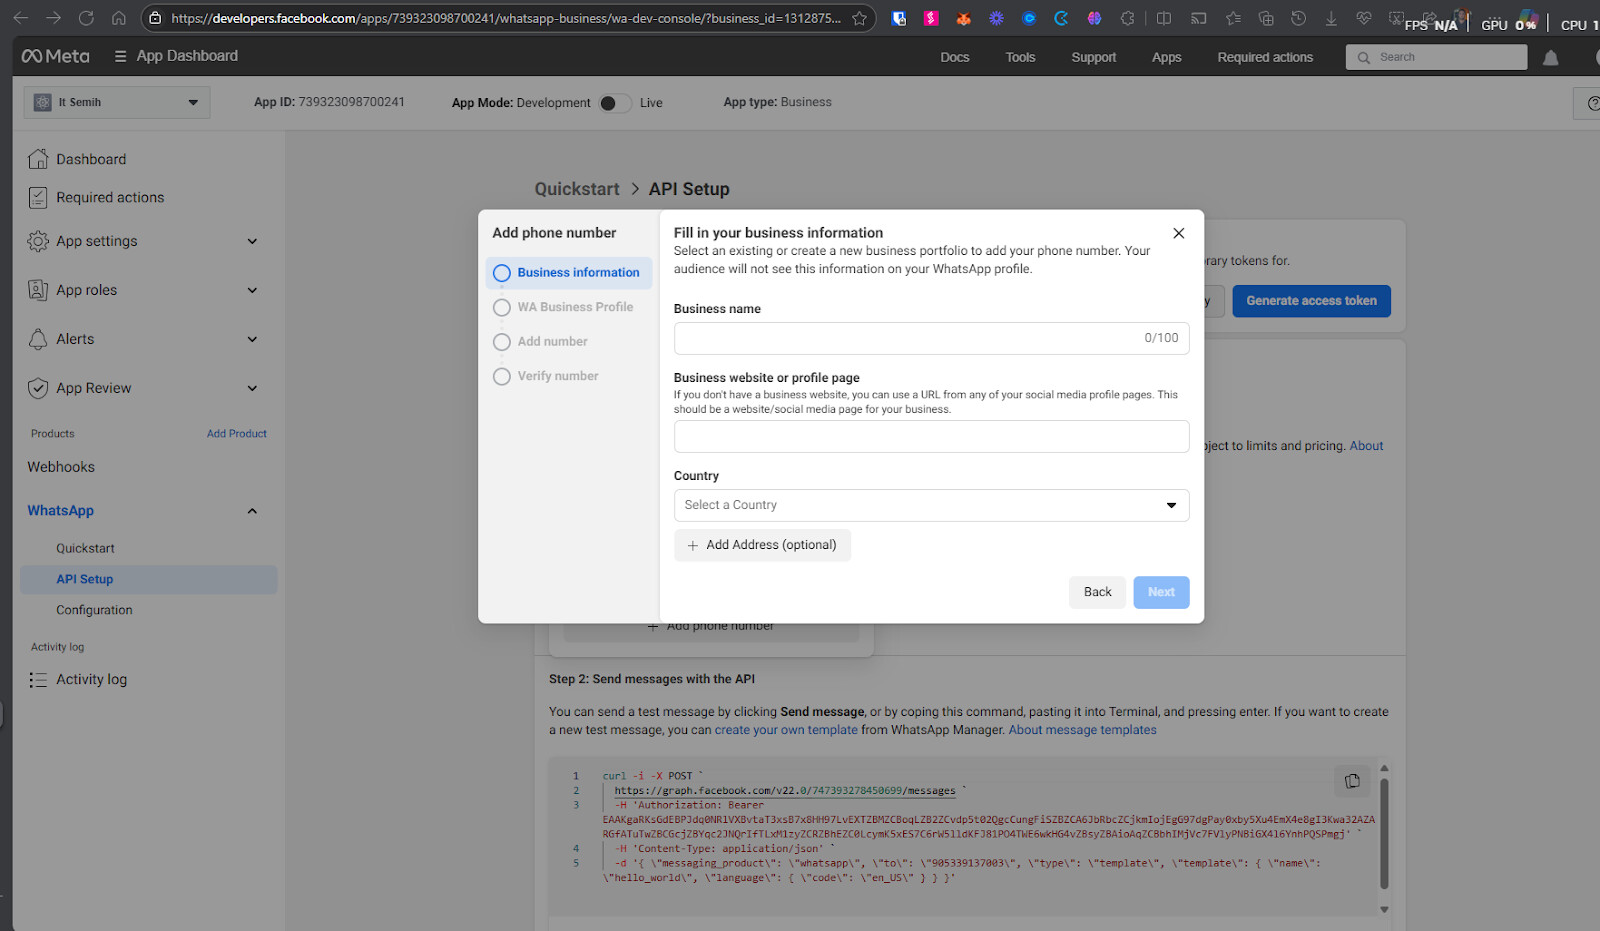
#### 🔹 8. Adding and Verifying a Phone Number
* The system will direct you to the **API Setup** screen.
* Add a new phone number here.
***
#### 🔹 8. Adding and Verifying a Phone Number
* The system will direct you to the **API Setup** screen.
* Add a new phone number here.
 ⚠️ **Warning**: The number must not have been used in any other WhatsApp account. If it has, that account must be deleted first.
* Complete the number verification process.
***
#### 🔹 9. Retrieving the Phone Number ID
* The verified number will be listed in the dropdown menu under the **From** field.
* The **Phone Number ID** listed under the number will be used in the Autom Mate Vault.
⚠️ **Warning**: The number must not have been used in any other WhatsApp account. If it has, that account must be deleted first.
* Complete the number verification process.
***
#### 🔹 9. Retrieving the Phone Number ID
* The verified number will be listed in the dropdown menu under the **From** field.
* The **Phone Number ID** listed under the number will be used in the Autom Mate Vault.
 💡 **Tip**:\
This ID won’t work with test numbers. It must be a verified, real number.
***
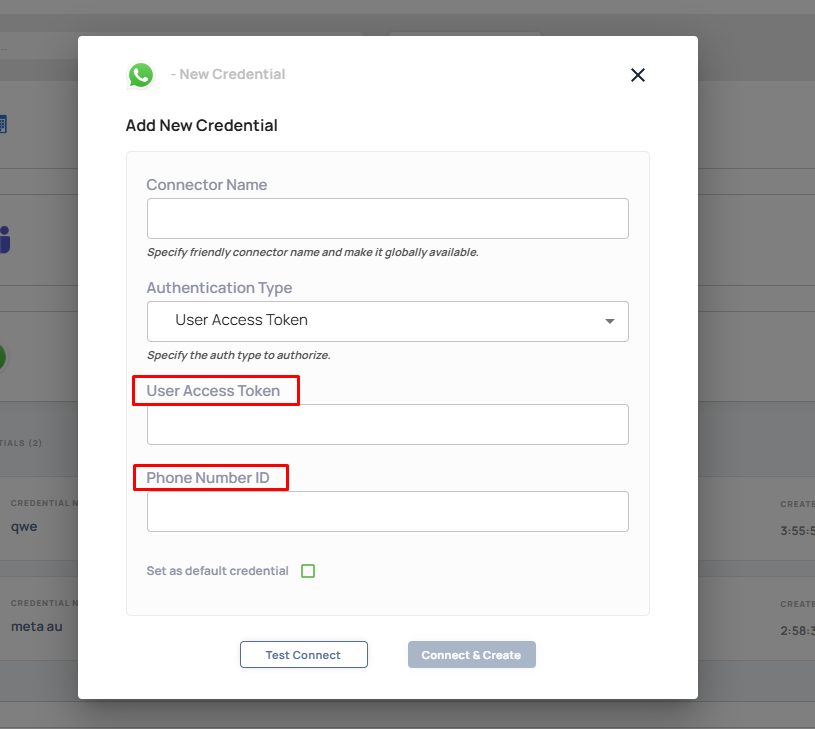
#### 🔹 10. Creating App Credentials in Autom Mate Vault
**Required fields:**
* **Token**: The permanent token created in Step 5.
* **Phone Number ID**: The number ID obtained in Step 9.
🟢 **Result**: You’re now ready to connect WhatsApp Business API with Autom Mate via the connector.
💡 **Tip**:\
This ID won’t work with test numbers. It must be a verified, real number.
***
#### 🔹 10. Creating App Credentials in Autom Mate Vault
**Required fields:**
* **Token**: The permanent token created in Step 5.
* **Phone Number ID**: The number ID obtained in Step 9.
🟢 **Result**: You’re now ready to connect WhatsApp Business API with Autom Mate via the connector.
 ***
#### 🔹 11. Setting Up the Webhook
* In the developer panel, go to your application and navigate to the **Webhooks** section.
***
#### 🔹 11. Setting Up the Webhook
* In the developer panel, go to your application and navigate to the **Webhooks** section.
 * For **Callback URL**, select the webhook trigger type in Autom Mate and paste the webhook URL.
 * Create a **Verify Token** and use the same value both in Meta and Autom Mate.
* Click **Verify and Save**.
* Finally, subscribe to the **messages** topic.
* Create a **Verify Token** and use the same value both in Meta and Autom Mate.
* Click **Verify and Save**.
* Finally, subscribe to the **messages** topic.
 ⚠️ **Warning**: The Callback URL must work over **HTTPS** and be publicly accessible.
***
#### 🔹 12. Adding Payment Information
* In Business Manager, go to the **WhatsApp Accounts** section.
* Select your registered phone number.
* Under **Payment Methods** at the bottom, enter a valid payment method.
⚠️ **Warning**: The Callback URL must work over **HTTPS** and be publicly accessible.
***
#### 🔹 12. Adding Payment Information
* In Business Manager, go to the **WhatsApp Accounts** section.
* Select your registered phone number.
* Under **Payment Methods** at the bottom, enter a valid payment method.
 🟡 **Note**: Meta allows test usage in some regions, but for live usage, a payment method is mandatory.
***
#### 🔹 13. Registering the Number via Autom Mate
* Create an Autom in Autom Mate.
* Add a **Restful Web Services > POST** action.
🔧 **Settings**:
**URI**:\
`https://graph.facebook.com/vXX.X//register`
**Headers**:
```
Authorization: Bearer
Content-Type: application/json
```
**Body**:
```
{
"messaging_product": "whatsapp",
"pin": "123456"
}
```
* Run the Autom to successfully register your number to the Meta system.
🟡 **Note**: Meta allows test usage in some regions, but for live usage, a payment method is mandatory.
***
#### 🔹 13. Registering the Number via Autom Mate
* Create an Autom in Autom Mate.
* Add a **Restful Web Services > POST** action.
🔧 **Settings**:
**URI**:\
`https://graph.facebook.com/vXX.X//register`
**Headers**:
```
Authorization: Bearer
Content-Type: application/json
```
**Body**:
```
{
"messaging_product": "whatsapp",
"pin": "123456"
}
```
* Run the Autom to successfully register your number to the Meta system.
 ***
#### 🧩 Post-Integration Checklist
✅ Token is permanent and securely stored\
✅ Phone Number ID obtained correctly\
✅ App Credentials added to Autom Mate\
✅ Webhook and message topics activated\
✅ Payment information completed\
✅ Register process completed successfully
***
**After completing all configuration steps**, test your **WhatsApp connection** as shown in the video below. This ensures that the integration has been successfully established.
🧪 **If you encounter any errors during the test** or experience issues such as messages not being delivered, please **let us know in the comments section**. Our community and support team will be happy to assist you.
📌 **Note:** Make sure your API keys are correctly configured, your app is live in the Meta Developer Console, and all required permissions have been granted.
***
**WhatsApp Business API Integration Test – Hello World Message via Autom Mate**
This video demonstrates a basic integration test using the Meta WhatsApp Business API within the Autom Mate platform. It showcases the process of sending a simple “Hello World” message and receiving a response through the integration.
📺 Click to watch on YouTube: [WhatsApp Guide](https://www.youtube.com/watch?v=rhBeK5VVwc8)
***
#### 🧩 Post-Integration Checklist
✅ Token is permanent and securely stored\
✅ Phone Number ID obtained correctly\
✅ App Credentials added to Autom Mate\
✅ Webhook and message topics activated\
✅ Payment information completed\
✅ Register process completed successfully
***
**After completing all configuration steps**, test your **WhatsApp connection** as shown in the video below. This ensures that the integration has been successfully established.
🧪 **If you encounter any errors during the test** or experience issues such as messages not being delivered, please **let us know in the comments section**. Our community and support team will be happy to assist you.
📌 **Note:** Make sure your API keys are correctly configured, your app is live in the Meta Developer Console, and all required permissions have been granted.
***
**WhatsApp Business API Integration Test – Hello World Message via Autom Mate**
This video demonstrates a basic integration test using the Meta WhatsApp Business API within the Autom Mate platform. It showcases the process of sending a simple “Hello World” message and receiving a response through the integration.
📺 Click to watch on YouTube: [WhatsApp Guide](https://www.youtube.com/watch?v=rhBeK5VVwc8)